
We all want a site that is as fast, accessible, and beautiful as possible. And with good practices, we can make the SEO love us.
As we all know, a website allows us to do an infinite number of things, from posting a photo on a social network to selling our products and advertising our brand. That is why we all want our site to be as pleasant as possible for our visitors and users, but... How do we achieve it? With good practices.

We are going to start with one of the most important topics for our website, SEO allows it to be found by search engines such as Google and Bing, among others. In addition, many sites (especially social networks) use this information to generate a preview card in posts or chats. For example, if you share this post it would look something like this:

So to have a good SEO we must add the following within the HTML code of our site or web application (especially the home page) within the <head> tag we add the following tags:
<head>
    <!-- Primary Meta Tags -->
    <title>Titulo de mi web</title>
    <meta name="title" content="Titulo de mi web" />
    <meta name="description" content="Descripción de mi web" />

    <!-- Open Graph / Facebook -->
    <meta property="og:type" content="website" />
    <meta property="og:url" content="https://www.site.com/" />
    <meta property="og:title" content="Titulo de mi web" />
    <meta property="og:description" content="Descripción de mi web" />
    <meta property="og:image" content="./images/preview.jpg" />

    <!-- Twitter -->
    <meta property="twitter:card" content="summary_large_image" />
    <meta property="twitter:url" content="https://www.site.com/" />
    <meta property="twitter:title" content="Titulo de mi sitio" />
    <meta property="twitter:description" content="Descripción de mi web" />
    <meta property="twitter:image" content="./images/preview.jpg" />
</head>
You can generate these tags and test your site here


But why are some of these labels repeated?
Some sites use the information from our site to show a card or preview of our website before entering it, and with these same tags we make specific settings for Facebook, another for Twitter, and also for other platforms.
What happens if I build my site with Next or Nuxt?
These technologies have their own way of configuring SEO, here are the direct links to the documentation.


SEO is not only tags in our <head>
While the tags on our site are essential for visibility, it's not everything either. We must also have a good structure on our site.
We have to forget about using only <div> for everything
We tend to have the false belief that with a <div> and using CSS we have the same as any HTML tag, and although it has a foundation on a visual level, it does not apply internally.
This will make us have to add extra JS and CSS code, it also affects SEO since search engines and web robots see all content with almost the same importance. To fix this we need to use the right tags in the right place.
Let's look at some of the most important:
<h1>, <h2>, <h3>...
The header or title tags must be used specifically in titles, so that search engines know their importance within our content, we must remember to have an order with these, starting with <h1> towards <h5> as we go down in our website, as we will always be placing the most important content at the top of our website.
In modern layouts, we can simply use <h1> and give it different sizes as needed since the important thing nowadays is to mark it for the browser as "This is a title".
<main>
We will start by mentioning the fundamental rule of this tag: "There should only be one of these tags on a whole page"
The reason behind this rule is that this tag, in addition to behaving as a <div>, is interpreted by the browser as the main content of our page. This will make the search engines give more prominence to that content when we find it and even show it in the search engine thumbnail.
<form>
This hated tag in the modern web for its action of reloading the site when we use SPA is very underestimated, since the idea is to kill the event that reloads the site when submitting a form with JS, but always use the submit event to fire by example a function that will have the request code.
And although this tag is not as important for SEO as the others, it is important for many other things, especially for UX.
The advantage here is that the browser pressing Tab will make the cursor jump from input to input inside the form like magic. This is an advantage for UX and for the developer who saves a lot of code by not having to program that action.
<ul> and <li>
This pair is inseparable and very important for search engines since when using words like "List of..." search engines usually look for these tags on sites in order to give you a more accurate result.
<nav> and <footer>
This tag can be painted like any <div> or <p> tag but it helps the developer see where the Navbar HTML starts. And also the search engine will be able to make more appropriate use of the information found there, such as marking the links in a list. It also allows you to create code that is easier to read.
The same happens with <footer> since it is like a NavBar but with less prominence.
<header>
As its name indicates, it creates a page header, its appearance does not change but the search engines give them a lot of importance and in addition to that we must use it whenever we can in the section that we usually call "Hero" or "Heading"
Finally, make special mention of a very ignored attribute when inserting images on our website. We talk about the alt attribute that allows us to add a description to the image that will be read by screen readers or when the image is not found, this text will tell us what we should have seen. In addition, the search engine uses it to find these photos when a user searches for words that it contains.
Similarly, we can use the title attribute on images to give them a plus, like a name.
I leave you an example of what an image would look like with good practice:
<img src="./images/photo.png" title="Photo" alt="Fotografia en la playa" />Optimizing our photos, images and icons are super important, because if our site loads slowly due to heavy photos, users will leave soon and probably won't come back.
But we also run the risk of blurry images and icons, and no one likes to see low-quality images.
It can feel like a push and pull, but there is an ideal tool for this case, called Squoosh, which will allow us to compress, resize and convert our images.
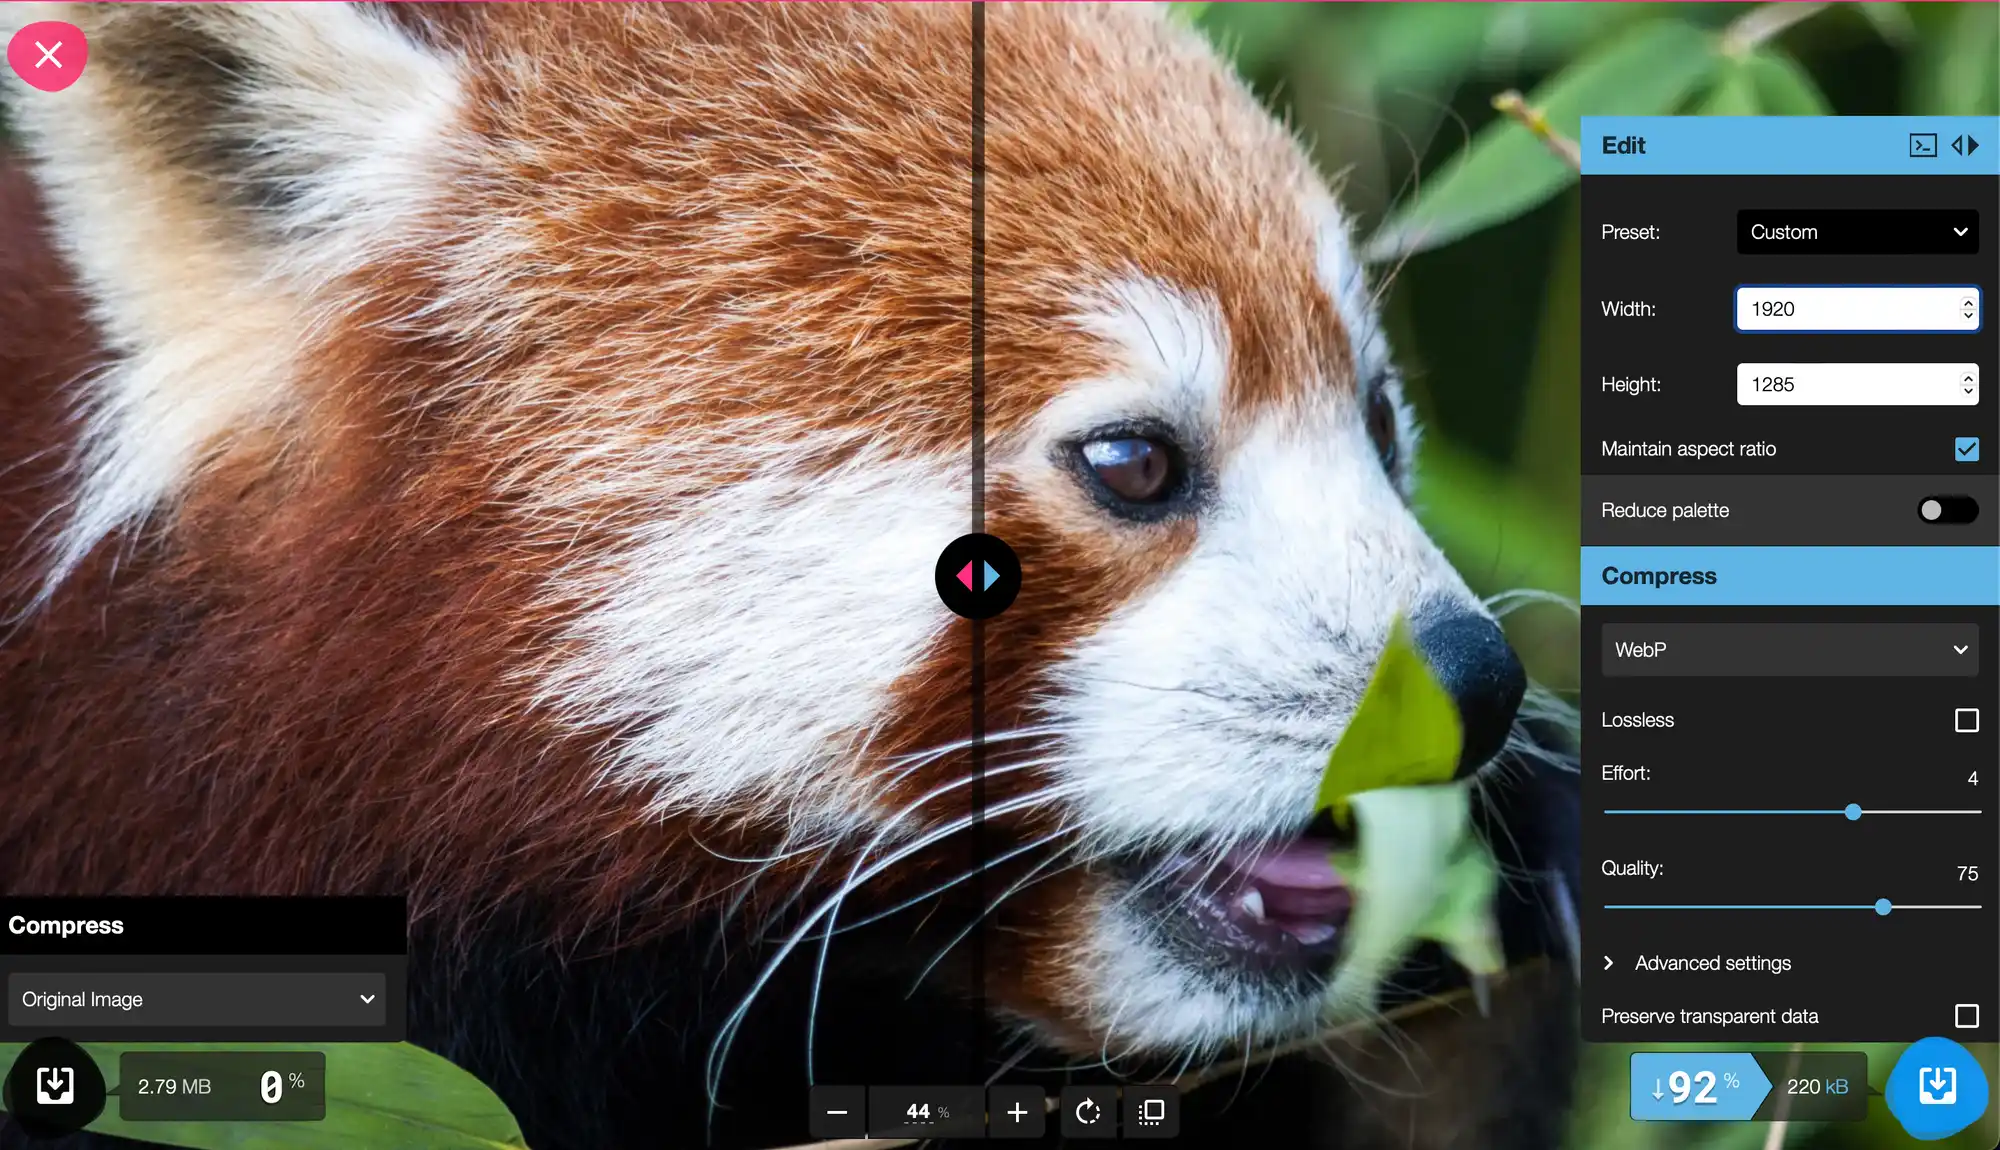
As you can see, it allows us to see the before and after by sliding a bar, in addition to resizing our photos and making them lighter and the best thing is that it is totally free 🔥
There are more practices that you should know but for that, you have to stay tuned for part two!